Wait until Wednesday! The Speckle Automate Public Beta goes live then.
Hello Specklers! ![]()
At SpeckleCon 2024, our QA/QC Workshop was standing-room-only! This post serves as a reminder for those who attended and an overview for anyone eager to explore the materials covered.
![]() Important: This isn’t a full tutorial (yet). It’s a package of materials summarising what we explored during the workshop. While some in-person explanations are missing, it’s a solid starting point for those wanting to dive into QA/QC automation.
Important: This isn’t a full tutorial (yet). It’s a package of materials summarising what we explored during the workshop. While some in-person explanations are missing, it’s a solid starting point for those wanting to dive into QA/QC automation.
![]() Note: A video walkthrough is in the works to provide a step-by-step guide—stay tuned!
Note: A video walkthrough is in the works to provide a step-by-step guide—stay tuned!
What Will You Learn?
This workshop introduces:
- Deploying your first Speckle Automate function using the Public Beta.
- Adding user-configurable inputs for adaptable automation.
- Defining and validating rules directly in code.
- Transitioning to spreadsheet-driven rule systems for collaboration and scalability.
Why This Matters
With the Public Beta of Speckle Automate, now is the perfect time to start building collaborative QA/QC workflows:
- Customisable and Scalable: Adjust your validation rules without needing code changes.
- Collaborative Workspaces: Private functions run securely in Workspaces, enabling shared workflows.
- Future-Ready: Automate compliance checks, reporting, and more—all integrated with Speckle’s ecosystem.
What You’ll Need
- A verified Speckle account: Sign up here.
- A Workspaces-based project with at least one model containing Revit data.
- Basic Python knowledge and a Python-ready development environment.
How to Replicate the Workshop
Step 1: Create a Function Using the Speckle Automate Wizard
- Navigate to Speckle Automate.
- Click “New Function”.
- Follow the wizard:
- Choose the Python template.
- Add details like name, description, and optional tags (e.g., “QA/QC”, “Workshop”).
- Finish the wizard to create your function repository.
Step 2: Import Workshop Files Into Your Function Repository
- Open the function repository created by the wizard.
- Replace the default files with those from the QA/QC Workshop Repo.
Step 3: Follow the Workshop Exercises
- Access the slides here: Workshop Slides.
- Progress through the exercises:
-
 Exercise 0: From Zero to Deployment – Create and deploy your first function.
 -
 Exercise 1: Adding Configuration – Users customise automation inputs.
 -
 Exercise 2: QA/QC I – Define rules in code to extract and check properties.
 -
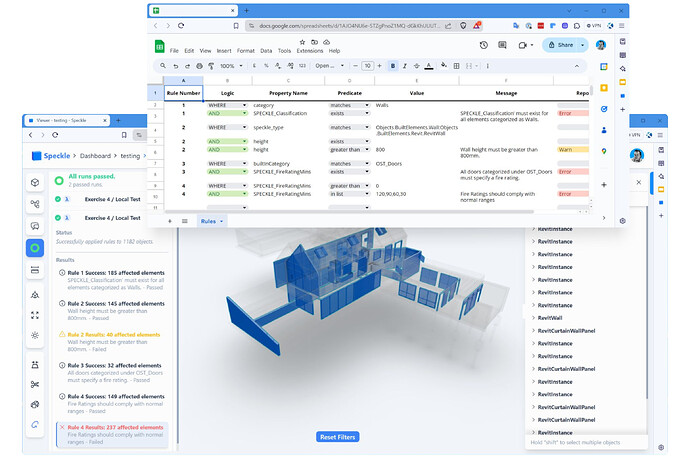
 Exercise 3: QA/QC II – Implement flexible rule systems to validate design data.
-
Step 4: For Exercise 3 – Publish the Template Google Sheet
- Access the template Google Sheet: QAQC with Speckle Automate.
- Make a copy in your own Google account.
- Publish it as a Tab-Separated Values (TSV) file:
- File → Share → Publish to the web → Select TSV.
- Copy the published link.
- Use this link when running the function.
Step 5 (Optional): Learn About Local Testing
- If you want to explore further:
- Use the repo files to set up the project on your local machine.
- Use the Speckle Python SDK to fetch live data.
- Test and debug your logic locally before redeploying.
This guide is the perfect primer for getting started with QA/QC workflows using Speckle Automate. Stay tuned for more resources and the upcoming video walkthrough.

