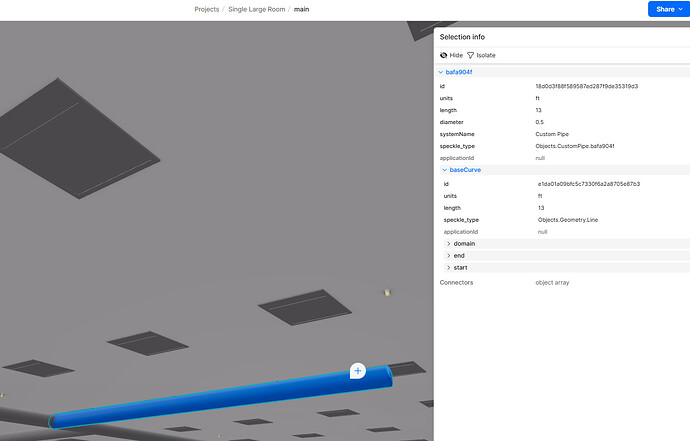
Hi Jonathon, regarding this… I have a script to generate Revit pipes. This creates regular native pipes in revit but in the speckle viewer I only see lines not pipes. Is there a way to see the pipes as pipes in the viewer? Thanks in advance.
The Speckle viewer doesn’t implicitly know what a pipe is, and the lines you see are the correct parametric definition of a Revit pipe.
However, a displayable object in the viewer has an additional displayValue prop, an array of displayable geometries, usually meshes. The Speckle Revit connector generates a mesh representation of Pipe when publishing from native revit.
It would be best to do this with a library referenced by your automate function. In most cases, I have found the greatest success with Trimesh (Python) and Helix (Csharp). These both have a singular method for “mystifying” an extrusion along a vector. Trimesh also has meshing from an extrusion along a path.
Jonathan, on the same topic. Pipes generated by Python come into Revit as reinforcement bars. Are there any watch its when generating Revit native objects in Speckle with Python?
That sounds curiously suspicious - I’d need to know a bunch more to understand why!!
Thanks for the response Jonathon. We have a Python algorithm that creates pipes to serve fire sprinklers (see the image, in the image elevation of the pipe is wrong - we will fix that later). After we placed the pipes and send the model back to Revit, pipes are coming in as rebar.
Pipes are created using a custom Pipe class we have written.
Gotcha - Im travelling pst SpeckleCon but I can POC something quickly later to see if we can work around this.
Thank you. Talk to you next week.
I think you might like our Private Automate announcement also !!!
@mmelek the issue stems from how the Speckle Revit connector interprets objects when their speckle_type isn’t recognised. By default, the connector uses speckle_type to determine how to deserialize and place objects in Revit. In your case, since you’re defining a custom Pipe class, the connector doesn’t know how to handle it and defaults to something it does support, like Rebar.
Solution: Use Compound speckle_type Inheritance
To ensure compatibility with Revit while extending Speckle’s types, you need to:
1. Match the expected structure for Pipe and RevitPipe.
2. Append a compound speckle_type in the format:
BaseType:CustomType
This tells the connector to interpret the object as a Pipe or RevitPipe first, and then append your custom properties.
Example: Custom Pipe and RevitPipe in Python
Here’s how you can define CustomPipe and CustomRevitPipe in Python:
from specklepy.objects.base import Base
from specklepy.objects.geometry import Line
from specklepy.objects.other import Level

class CustomPipe(Base):
    """
    Custom pipe class inheriting the structure of
    Objects.BuiltElements.Pipe with compound speckle_type
    for compatibility.
    """
    def __init__(
        self,
        baseCurve: Line,
        length: float,
        diameter: float,
        units: str = "ft",
        systemName: str = "",
        **kwargs,
    ):
        super().__init__()
        self.baseCurve = baseCurve
        self.length = length
        self.diameter = diameter
        self.units = units
        self.systemName = systemName
        self.speckle_type = (
            "Objects.BuiltElements.Pipe:CustomPipe"
        )  # Compound type
        self.displayValue = kwargs.get("displayValue", None)


class CustomRevitPipe(CustomPipe):
    """
    Custom Revit pipe class inheriting from CustomPipe and
    matching Objects.BuiltElements.Revit.RevitPipe structure.
    """
    def __init__(
        self,
        family: str,
        type: str,
        baseCurve: Line,
        diameter: float,
        level: Level,
        systemName: str = "",
        systemType: str = "",
        parameters: dict = None,
    ):
        super().__init__(
            baseCurve, baseCurve.length, diameter,
            systemName=systemName
        )
        self.family = family
        self.type = type
        self.systemType = systemType
        self.level = level
        self.parameters = parameters or {}
        self.speckle_type = (
            "Objects.BuiltElements.Revit.RevitPipe:CustomRevitPipe"
        )  # Compound type
Why This Works
speckle_type:
•Objects.BuiltElements.Pipe:CustomPipeensures it’s recognised as a Pipe.
•Objects.BuiltElements.Revit.RevitPipe:CustomRevitPipealigns with Revit’s expectations for pipes.- Extensible Structure: You can add custom properties (like systemName, parameters, etc.) without breaking compatibility.
- Revit Connector Compatibility: The connector will process it as a Pipe and place it correctly.
Creating and Sending a Pipe
Here’s an example of creating and sending a CustomRevitPipe:
from specklepy.objects.geometry import Line, Point

# Geometry
start = Point(x=0, y=0, z=10)
end = Point(x=10, y=0, z=10)
base_curve = Line(start=start, end=end)

# Level placeholder
level = {"name": "Level 1", "elevation": 10}

# CustomRevitPipe creation
custom_pipe = CustomRevitPipe(
    family="Generic Pipe",
    type="Standard",
    baseCurve=base_curve,
    diameter=0.5,
    level=level,
    systemName="Fire Sprinkler",
    systemType="Hydronic Supply"
)

print(custom_pipe.speckle_type)
# Outputs: Objects.BuiltElements.Revit.RevitPipe:CustomRevitPipe
Next Steps
- Test sending the CustomRevitPipe to Speckle.
- Receive the model back into Revit – the pipes should now appear correctly.
By matching the schema and appending the compound speckle_type, you ensure your custom class remains compatible with Revit’s Speckle connector.
Let me know if this solves your issue or if you need further clarification! ![]()
