Hello!
Is it possible to publish a model with frame by frame navigation by buttons?
I’m looking for a way to make a step-by-step assembling tutorial.
Source model is made on Blender.
Do you mean frame-by-frame to mean scenes or actual frames of animation?
If it is a single model with gradually appearing elements, then theoretically, that can be done with a combination of View Comments with property-based visibility filtering.
We call this Slideshow Mode, but each saved comment and view would need to combine with hiding elements not yet part of the assembly (like the cantilever slide in the below):
Yes, it might be close to my purpose.
I’m working on beading tutorial, objects should change visibility, positions.
To show the thread movement progress I use Start&End Mapping, but it could be adjusted.
Now each step corresponds to the frame in Blender, 30-150 steps for tutorial, depending on complexity.
Process:
Result:
Hi, I’ve given a quick go at achieving something close to what I think you want, using our comments slideshow.
I don’t think it’s 100% what you are looking for, but I’d thought I’d show it off anyway. @jonathon may have some ideas about how I should be doing this better.
I created this very simple animation, with a ball position, and a cube array modifier animating (semi-designed to highlight the limitations of my approach)
I then created a python script (below) to take the objects in my scene (at frame 0), convert them to SpeckleObjects, increment the frame by a specified amount, then convert the current scene, and so on… for each step.
It will send all these converted objects, grouped by their “step” to Speckle.
From Speckle, I was then able to manually create “comments” for each step, with that “step” object isolated in the Viewer.
The end result looks something like this:
You’ll notice, there are some pretty obvious limitations with this approach.
Most notably, our isolate objects filter (used to highlight a step) will still render the “hidden” geometry as a transparent “ghost”. And since I’m sending each “step” as separate geometry, there are actually multiple copies of each cube in the same place, compounding the transparencies to make them appear stronger. You’ll notice the ones start look almost fully opaque, whereas the ones at the end appear ghosted how they should. This could be worked around, with the right python code however.
Secondly, you’ll see, clicking the next commend button in slideshow, the camera nicely interpolates between the two comments, but the filters do not. Which may be undesirable.
import bpy
from bpy_speckle.convert.to_speckle import convert_to_speckle
from specklepy.api.client import SpeckleClient
from specklepy.api.credentials import get_default_account
from specklepy.api.operations import send
from specklepy.objects.base import Base
from specklepy.transports.server.server import ServerTransport


#### Change these variables to suit

total_number_frames = 100 # the total number of frames in my animation
total_number_steps = 10 # the number of "steps" to process
streamid = "76c45cdb32" # the stream id (that you've already created) to send to
speckle_server = "speckle.xyz" # the speckle server you are using


def send_animation_to_speckle():
    frames_per_step = total_number_frames // total_number_steps

    step_objects = []
    for step in range(0, total_number_steps ):

        frame = step * frames_per_step

        bpy.data.scenes['Scene'].frame_set(frame)
        print(f"setting frame to {frame}")
        step_objects.append(convert_step(step))

    commit_object = Base()
    commit_object["@steps"] = step_objects

    # Grab our default account
    client = SpeckleClient(host=speckle_server)
    client.authenticate_with_account(get_default_account()) # We assume your default account (set through manager) is one valid for this streamid & server url
    transport = ServerTransport(streamid, client)
    objectid = send(commit_object, [transport])
    client.commit.create(streamid, objectid)
    print("sent!")

def convert_step(step) -> Base:

    converted = []
    for obj in bpy.data.objects:
        converted.append(convert_to_speckle(
            obj,
            1.0,
            "m",
            bpy.context.evaluated_depsgraph_get()
            ))

    step_object = Base()
    step_object["name"] = f"Step {step}"
    step_object["@elements"] = converted
    print(f"Converted step {step}: {len(converted)} objects added")
    return step_object


send_animation_to_speckle()
To run this, simply open the Scripting layout, create a new file, paste in the above python code, change the variables clearly marked, and press “play”.
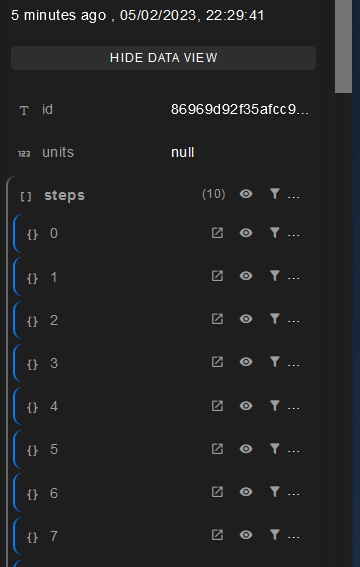
Once it’s completed, there will be a new commit on the “main” branch of the specified stream.
Which will have each “step” nested as below
From there, you can create comments for each step, with that step isolated. (the funnel icon pictured above)
And then, under the share button (top right) create an embed with “comment slide show mode” enabled.
You could properly hide objects in the data view menu on the left (the eye icon). I added 2 comments and you could do it for each step?: https://latest.speckle.dev/streams/c1faab5c62/commits/96bf5988bc?cId=f6baa1e0a3 + https://latest.speckle.dev/streams/c1faab5c62/commits/96bf5988bc?cId=2316374526
Ah yes, this would have been so much better to use. ![]() Thank you!
Thank you!
(I guess I thought that it would work the same as isolate, but inverted selection, but turns out, no! ![]() )
)
Tho, this makes it a little more tedious to setup the comments. Perhaps the comment creation process could be automated somehow… ![]()
ahem Gotta catch-em-all


